Buy Classical Guitar Strings now
Classical Guitar Strings
The nylon, when under tension, starts to stretch. This makes it more prone to snapping as it causes micro-fractures in them. You will find that when they get old, it will be difficult to keep in tune and they may snap.
The bass strings (the 3 ones that have a silver winding wrapped around them) show you more obviously when they are old and need changing. These are usually silver-plated copper, so if the copper is starting to show through, this is a good indication that they need changing. They can also turn black due to the silver oxidising, again another indication that they need changing.
In between the windings, the wrapped strings get gunked up with dead skin cells, oil from your fingers, dust and lots of other yucky things. This causes the string to vibrate unevenly and so not give a good ring when plucked. You may also find that your fingers smell funny after you have played.
If you have broken one, this is another indication that you need to change all 6 of them, so that you get an even tone.
GETTING AN EVEN TONE
Remember, when you change them, change all 6 at the same time so that you get an even tone. If you really have to change just one single string, make sure you're using the same gauge, material and even brand to get as close as possible to an even tone.
If you need any help choosing strings for your classical guitar or need any help when trying to fit them, contact us or drop by the store and we'll be happy to help.
Tools You'll Need
While not all of these tools and accessories are absolutely necessary, they will make the process a lot easier, keep your guitar in top shape and avoid damage while restringing your acoustic guitar.
You can find everything you need to restring your classical guitar strings in our store! Check out our Guitar Cleaning and Care page.
How to Restring a Classical Guitar: Steps
Below you will find a step-by-step guide on how to change the strings on a classical guitar
STEP 1
Firstly turn the machine heads clockwise to make them slack. Using a string winder can speed this part up significantly.

STEP 2

STEP 3

STEP 4
Remove the string from the barrel. This can be tricky so take your time.

STEP 5
Now remove the strings from the bridge.

STEP 6
If they're still too tight you can push the string through and unwind the loop.
STEP 7
Remove all 6 strings and give the bridge a good dust.

STEP 8
Add some Lemon oil to another cloth. Wipe it all over the fretboard but leave it to soak in for 30 seconds to hydrate the wood. This will also help soften any dirt and grime for a deep clean. After 30 seconds wipe the fretboard dry.

STEP 9
Now give your guitar a thorough clean and polish with a different cloth as the lemon oil can damage your guitars finish.

STEP 10
Get your new set of strings ready.
STEP 11
Sort the new strings, ready for installation. Take note of the system used to identify each string and what order they need to go in.

STEP 12
Push the string through (from the sound hole side) the hole in the bridge. Start with the thickest string.

STEP 13
You will need around 3 inches pushed through. We will refer to this as the tail.

STEP 14
Take the tail, bend it back over the bridge and to the right of the string.

STEP 15
Loop the tail around the bottom of the string and back on itself.

STEP 16
Feed the tail under itself and pull the slack through.

STEP 17
Again, feed the tail under itself a second time.

STEP 18
Now pull on the longer part to make the knot tight.

STEP 19
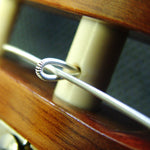
Here is a close up of the knot, with the string resting on the saddle.

STEP 20
Repeat this process again with the next string.

STEP 21
On the next knot take the tale and tuck it in.

STEP 22
Here is a close-up showing how the tail is tucked in.

STEP 23
Repeat with the rest. With the thinnest E bring it back in the opposite direction and tuck it under the B string.

STEP 24

STEP 25
Measure 6 inches (15 cm) past the required tuner roller (Low E is bottom right).
STEP 26
Cut the string with wire cutters at the 6 inch mark.

STEP 27
Pass the string over the tuner roller and then pass it down through the gap.

STEP 28
Feed it from underneath and up through the hole.

STEP 29
Feed approx 3 inches (7 cm) through the roller to give us another tail.

STEP 30
Fold over the tail approx 1/3 inch (1cm).

STEP 31
Loop this little hook over the longer part of the string and put it back through the hole in the roller.
STEP 32
Pull on the longer part of the string that passes down the neck to make the loop tight.

STEP 33
The next step is much easier with a string winder.

STEP 34
Keep the string under tension as you windup up all the slack and bring the string up to tension.

STEP 35
This usually leaves you with around 4 winds. Keep the loops looking like this (working towards the middle of the headstock).

STEP 36
Now repeat for the rest of the strings. You can now tune and stretch the strings in. Happy playing!

BUY CLASSICAL GUITAR STRINGS
Ready to restring your classical guitar? Shop our selection of top-quality classical guitar strings and get your guitar sounding its best!
Shop classical guitar strings now!
FINAL NOTES
Hopefully you've found this guide on how to change your classical guitar strings useful!
After a few times doing this, you'll be doing this process much quicker. There are a lot of fiddly steps so It can be slightly daunting at first, but doing it properly will make your guitar far nicer to play. Good luck!
You can grab any of the classical guitar parts or accessories mentioned in this guide on our website, and check out our other helpful how-to-guides to get the most and best from your instrument.